How the Automodeler works
The conversation with the agent
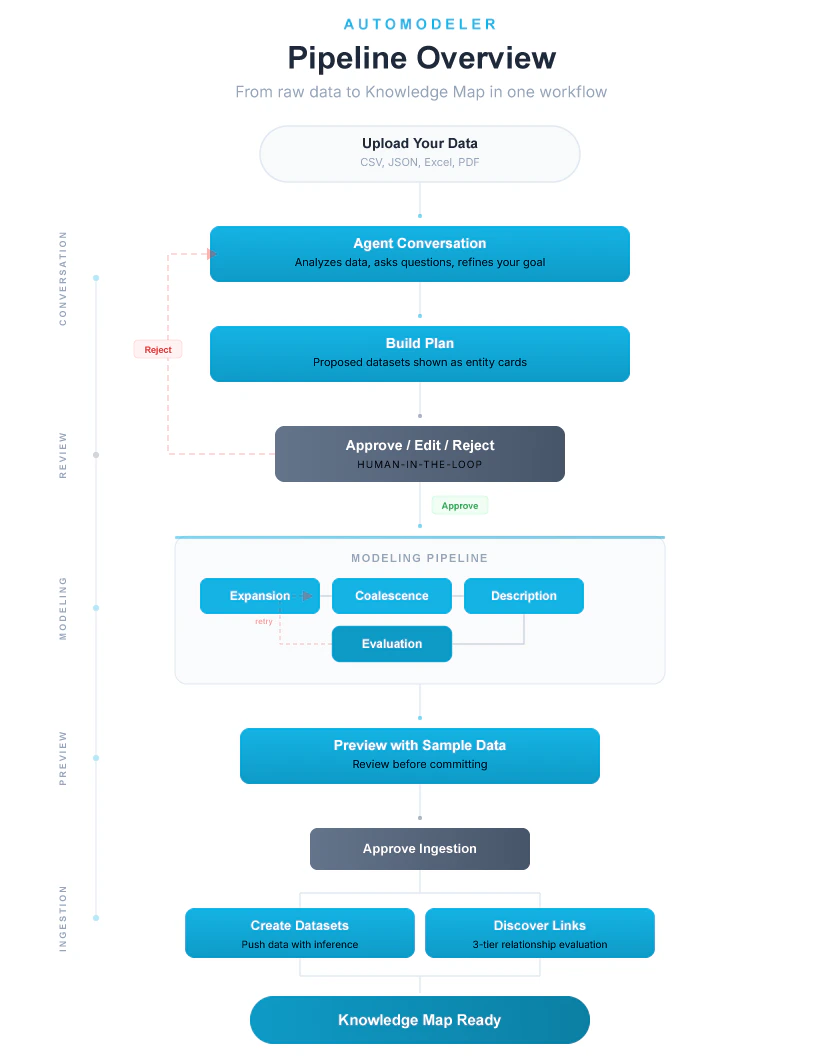
The Automodeler agent is a data consultant you interact with via chat. The flow is as follows:- You upload your data. CSV, PDF, Excel, JSON, or any structured format you have.
- Goal setting. “What do you want to do with this data? Who will use it?”
- Real conversation. The agent analyzes the data silently, then asks specific questions. It does not blindly accept everything you say. If your goal does not align with the data, it tells you. If it is vague, it asks you to be more precise.
- Plan building. Once it has enough information, it shows you the datasets it will create as visual cards, for example “Issues,” “People,” “Technologies,” with their respective fields.
- Approval request. You can approve, edit, or reject the plan.
- Pipeline run. If approved, it executes the Automodeler to create the datasets.
- Review. It shows the result on the board. You can modify fields, rename elements, add or remove datasets.
- Ingestion. Once you are satisfied, the agent pushes the data into the datasets so they are ready to use.
Agent tools
The agent has access to a set of tools that it uses as needed:| Tool | Description |
|---|---|
analyze_data | Silently analyzes the data, columns, types, quality, and patterns. |
ask_user | Asks a question with clickable options and buttons. |
request_approval | Requests approval with Approve, Edit, and Reject buttons. |
craft_prompt | Builds the visual plan with proposed entities shown as UI cards. |
deep_plan | Shows a step-by-step execution plan. |
run_pipeline | Executes the Automodeler, either the full pipeline or a partial run. |
edit_dataset | Edits a dataset: rename, add, or remove fields. |
create_dataset | Creates a new dataset from scratch. |
generate_samples | Generates sample rows to preview a dataset. |
get_board_state | Checks the current board state, datasets, fields, and relationships. |
report_status | Updates the UI status bar. |
The pipeline
The pipeline has four phases. Each phase builds on the output of the previous one, and the pipeline includes quality gates and human-in-the-loop checkpoints throughout.Phase 1: Modeling
Objective: take raw data and determine which datasets to create.Load existing schemas
The pipeline checks DataLinks to see if datasets already exist in this namespace. If they do, they are used as a base so the Automodeler builds on your existing structure rather than starting from scratch.
Refine the prompt
The AI enriches your goal, suggests entities, and refines language. It also assesses its own confidence. If confidence is low (at or below 60%), the pipeline pauses and asks clarification questions. Your answers are folded back into the prompt for the remaining steps.
Expansion
This is the most important step. The AI takes each row of your data and creates 10 to 15 new columns representing classifications, categories, entity types, and extracted attributes.If a row contains multi-valued fields, the expansion splits it into multiple rows. For example, if you have a row with
labels: "bug, performance", the expansion produces two rows, one for “bug” and another for “performance.” This is called row multiplication.Coalescence
With many new columns created, the AI groups them into logical datasets. Columns related to people go into a “People” dataset, technologies into “Technologies,” and so on. Each dataset gets a natural identifier, for example a person’s name or an issue number.Key rule: this is NOT a relational database. There are no foreign keys. Each dataset is independent. Relationships are discovered later based on the data itself.
Description
The AI writes descriptions for each dataset and each field, explaining what they represent and how they are used. If a description comes back empty, the pipeline falls back to using the dataset name.
Phase 2: Preview
Sample data
The pipeline generates sample rows for each dataset so you can preview the result before proceeding.
(Optional) Human-in-the-Loop
If enabled, the pipeline pauses here and shows you the result. You can:
- Approve as-is
- Edit fields, names, and descriptions
- Reject and restart
Phase 3: Ingestion
Phase 4: Ontology
Evaluate relationships. After the data is ingested, the system discovers relationships between datasets. It works at three levels:- Level 1, Self-links. Same column within the same dataset. Automatically approved.
- Level 2, Same name. Identical column names across datasets, for example
author_nameandperson_name. Automatically approved when values match. - Level 3, Different names. Columns with different names but potentially the same meaning. The AI evaluates semantic similarity before linking.
Summary diagram
Pipeline configuration
The Automodeler accepts a configuration object that controls which phases run and how the pipeline behaves.| Parameter | Type | Description |
|---|---|---|
namespace | string | The target namespace for created datasets. |
userPrompt | string | Your description of what you want to do with the data. If omitted, a smart default prompt is used. |
data | array | The raw data to model and ingest. |
maxRowsForModeling | number | Maximum rows sent to the LLM during modeling. Larger datasets are sampled down to this limit to control cost and latency. |
maxEvalRetries | number | Maximum evaluation loop retries before accepting the result. Default is 3. |
maxSampleRows | number | Number of sample rows generated per dataset during preview. |
enableHumanInTheLoop | boolean | When true, the pipeline pauses at clarification and schema review checkpoints. When false, it runs end-to-end without stopping. |
model | boolean | When false, skips the modeling phase. Use with predefinedSchema to ingest into a known structure. |
ingest | boolean | When false, runs only modeling without creating datasets or pushing data. Useful for previewing what the Automodeler would produce. |
ontology | boolean | When false, skips relationship discovery after ingestion. |
predefinedSchema | array | Dataset schemas to use instead of running the modeling phase. The pipeline skips directly to ingestion. |
llm.provider | string | The LLM provider to use. Falls back to an alternative if the requested one has no API key configured. |
llm.model | string | The specific model to use. If omitted, a default is selected based on the provider. |
llm.explosionTemperature | number | Temperature for the expansion step. |
llm.coalescenceTemperature | number | Temperature for the coalescence step. |
llm.evaluationTemperature | number | Temperature for the evaluation step. |
llm.ontologyTemperature | number | Temperature for the relationship evaluation step. |
Hooks and checkpoints
The pipeline uses three hook points for human-in-the-loop interaction:- Clarification hook (during prompt refinement). Fires when the AI’s confidence in interpreting your goal is at or below 60%. The pipeline emits questions to the UI and waits for your answers before continuing.
- Schema review hook (after sample data generation). Fires after modeling completes. The pipeline presents the proposed datasets and sample rows, then waits for your approval.
- Token refresh hook (before ingestion). If your session token has expired during a long review, the pipeline refreshes it before proceeding.
Tracing and observability
Every pipeline run generates aRunTrace object that records the full execution history:
- A unique
runIdfor correlation - Timestamps for start and completion
- Duration of each step
- Every LLM call with input/output token counts
- Number of evaluation iterations
- A summary with totals for LLM calls, tokens used, datasets generated, fields generated, and links activated
Error Handling
The pipeline classifies errors into two categories:- Retryable errors are transient failures (network timeouts, rate limits) that the pipeline can recover from by retrying.
- Fatal errors are unrecoverable failures that stop the pipeline and surface the error to the user.
How To Use the Automodeler
This section walks through using the Automodeler in the DataLinks web platform, step by step.Prerequisites
Before you begin, make sure you have:- A DataLinks account with access to the web platform
- A namespace where you want to create datasets (see How To Create a Namespace if you need one)
- A data file to upload (JSON, CSV, Excel, or PDF)
Start a new project
Navigate to your namespace in the DataLinks web platform and select Create a new dataset. Enter a name for your project and select your namespace from the dropdown. Click Next to continue.On the next screen, upload your data file. The Automodeler accepts JSON, CSV, Excel, and PDF formats. Select your file and click Next. The agent begins analyzing your data immediately.
Describe your goal
The agent asks what you want to do with this data and who will use it. Be as specific as you can. For example, instead of “organize this data,” you might say “I want to track which questions are about which topics and which supporting documents back up each answer.”The agent does not blindly accept everything you say. If your goal does not align with the data, it tells you. If it is vague, it asks follow-up questions to get more precise. This is a real conversation: the agent analyzes the data silently, then responds with specific questions based on what it found.If the AI’s confidence in understanding your goal is low, it pauses and asks clarification questions. Answer them and the pipeline incorporates your responses before continuing.
Review the plan
Once the agent has enough information, it builds a visual plan showing the datasets it intends to create. Each dataset appears as a card with its name, fields, and a brief description. For example, you might see cards for “Questions,” “Supporting Facts,” and “Context Paragraphs,” each with their respective fields listed.At this point the agent asks for your approval. You have three options:
- Approve to proceed with the proposed plan
- Edit to modify fields, rename datasets, or adjust descriptions
- Reject to start over with a different approach
Run the pipeline
Once you approve, the agent runs the Automodeler pipeline. The UI shows a step-by-step progress indicator as the pipeline works through expansion, coalescence, description, and evaluation.If the evaluation step determines that the proposed schema has issues (poor entity separation, unnecessary overlap, or a mismatch with your goal), the pipeline automatically retries the modeling loop up to three times before presenting the best result.After modeling completes, the pipeline generates sample rows for each dataset so you can preview what your data will look like. Review the sample data carefully. This is your last chance to request changes before ingestion begins.
Review the result
After the pipeline finishes, the result appears on a board view. You can see all created datasets with their fields and data. At this stage you can still make adjustments:
- Rename fields or datasets
- Add or remove fields
- Add or remove entire datasets
Ingest the data
Once you are satisfied with the structure, confirm the ingestion. The agent creates the dataset structures in DataLinks, then pushes your data through a two-step inference process: first extracting relevant field values from each row, then normalizing, cleaning, and standardizing them.All datasets are ingested in parallel. The pipeline includes short pauses between creating dataset structures and pushing data to allow for propagation. For large files, the full ingestion can take a few minutes.If your session has been open for a while (for example, during a long schema review), the pipeline automatically refreshes your authentication token before starting ingestion. You may see a brief “Session expired” message; this is handled automatically.
Discover relationships
After ingestion, the system automatically evaluates potential relationships between your datasets. It looks for self-links within datasets, columns with matching names across datasets, and columns with different names but semantically similar content. Confirmed relationships are activated and become part of your Knowledge Map.Once this step completes, your data is fully structured and interconnected. You can query it with AutoRAG, explore the Knowledge Map, or connect it to external applications.